NOTE : this blog is the shortest version i've ever made because it's to the point.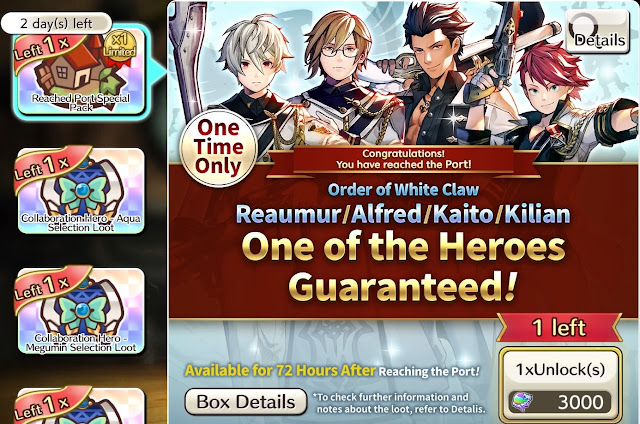


Last, you'll be asked to reincarnate, that's the point of the main story of all races.

So your best bet is to join a communicative guild that can help you, especially english speaking guild if you're on PS4 Asia server or PC/mobile.

Tanker & Damage Dealer will equip ★6 equipments (both main and sub) in the end.
Minimum level 3, sweet spot is level 4, end game is level 5.
Click the picture for the lootbox details.

Click the picture for the lootbox details.


Longer version 2
1. Choose Human or Elf race first
Because they have balance team (tanker, damage dealer, healer).
What should you do when you just started to play Caravan Stories
Just skip sub quests and reincarnate 5 times, then do daily every day and weekly every week (and event if there is any)
Because they have balance team (tanker, damage dealer, healer).
If you have chosen Dwarf or Orc, just continue the main story and reincarnate to Human or Elf.
Tutorials are in rectangle dialogue, so you can skip the conversation (in bubble speech) if you want.
Explore later and just skip all sub quests because the requirements are wasting time and the rewards are not worth it.
Because you have to reincarnate 5 times which is repeating no.2 to no.4 again.
Tutorials are in rectangle dialogue, so you can skip the conversation (in bubble speech) if you want.
Explore later and just skip all sub quests because the requirements are wasting time and the rewards are not worth it.
Because you have to reincarnate 5 times which is repeating no.2 to no.4 again.
5. DO NOT BUY ANY LOOTBOX THEY OFFER, ALL OF THEM ARE GARBAGE
See?
Why spend 6k PGems for these shits when we can get them for free from their stories.


Last, you'll be asked to reincarnate, that's the point of the main story of all races.
Reinstall World Map facility in caravan menu (press triangle) everytime you reincarnate.
Gessy and lizardman are available when you have reincarnated to human elf dwarf orc.
If you stuck at the main story of gessy or lizardman, just go to Nero and reincarnate to the last race.
By reincarnating, you'll unlock many features including event, daily, and access to other lootboxes.
What should you do after you have reincarnated 5 times
1. Do the daily everyday & weekly every weekTo get the in-game currencies (Points) that can be traded at Tradeshop in caravan menu to strengthen our team.
You won’t be able to evolve your heroes to ★6 if you don’t do daily & weekly.
You can check some of the dailies at the daily menu on the left of your screen.
2. Do the event mission & event quests if there is any event
To get event Points that can be traded at Shop in caravan menu to strengthen our team such as Sphera Ticket, Training Amulets, Runes, hero's Evolve Elemental Gems, etc.
Daily are top priority while doing the event quests & weekly.
Stop doing hero story & sub quest if there is any event, well, i already said just skip sub quest though.
Mission and event quest menu are also on the left of your screen.
All rounder / multi purpose team consist of :
• 1 Tanker
• 1 Recovery Buffer or 1 Healer
• 1 Quick buff Buffer
• 1 PDEF/MDEF Down Debuffer (match with your DD’s attack type) or 1 Technical/Trickster
• 2 Damage Dealers (DD)
For new players, we suggest to just use this balance team :
Sophia or Bogguz or Pollux as Tanker
Jhala and Philomena as Recovery Buffer or Slaveia as Healer
Rolomeu as Quick Buffer
Gessy Avatar as Debuffer or Wyngaard as Crowd Control
Waugogo and Riardo as Damage Dealers
Why them?
Sophia's base rarity is ★3, her Provoke is a very big circle and can buff Damage Reduction.
★1 ~ ★3 are frequently appear in Anima Converter's result, so Tanker and Damage Dealer with ★1 ~ ★3 rarity are easy to be strengthen.
Bogguz's base rarity is ★1, his Provoke is a bit smaller than Sophia but iirc his AS must be level 5, and iirc can buff Damage Increase to allies, we can get his ★5 equipments from adv. book by evolving him to ★5 (triangle for caravan menu → square).
Pollux's base rarity is ★1, his Provoke is as big as Sophia, we can get his ★5 equipments from adv. book by evolving him to ★5 (triangle for caravan menu → square).
Jhala (★1) can buff Recovery Over Time (regen), Damage Reduction & Damage Increase,
Philomena can buff Recovery Over Time, MDEF & PDEF Up.
Slaveia (★2) has the biggest recovery amount and also can buff Recovery Over Time.
Rolomeu (★1) can buff CT Reduction (reduce the charge time of active skills) and Quick (quicken the skill animation).
Gessy Avatar (★1) can debuff MDEF & PDEF Down and also Confuse the enemies.
Wyngaard (★3) can pull the enemies to a spot.
Mimi (★2) is Burn Inflicter, Burn is one of the Damage Over Time aside of Bleed and Poison.
Waugogo (★2) can debuff the enemies with PDEF Down (and when equipped ★5 equipments, she can buff herself with PATK Up).
Riardo (★3) can debuff the enemies with MDEF Down (and when equipped ★5 equipments, he can buff himself with Damage Increase), the problem is he's a limited hero which is we can't obtain him from his story because there is no his potrait on his story chapters.
So we can only get him from lootbox that has him in the lineup, or get 50 of his anima from Anima Converter then unlock him by using those 50 of his anima.
All of them are long range, so you should not have any problem in most of the battles.
Long range heroes is cheaper to build than short range heroes (melee), especially Damage Dealers.
Because short range Damage Dealers need 2 runes (54% Damage Reduction & 34% Damage Increase) while long range Damage Dealers only need 54% Damage Increase.
Also, short range Damage Dealers can only be used in Bahun demon raid, Colosseum and Duel, a.k.a not all rounder or multi purpose, so we don't recommend new players to build any short range Damage Dealers.
Click the picture for the lootbox details.
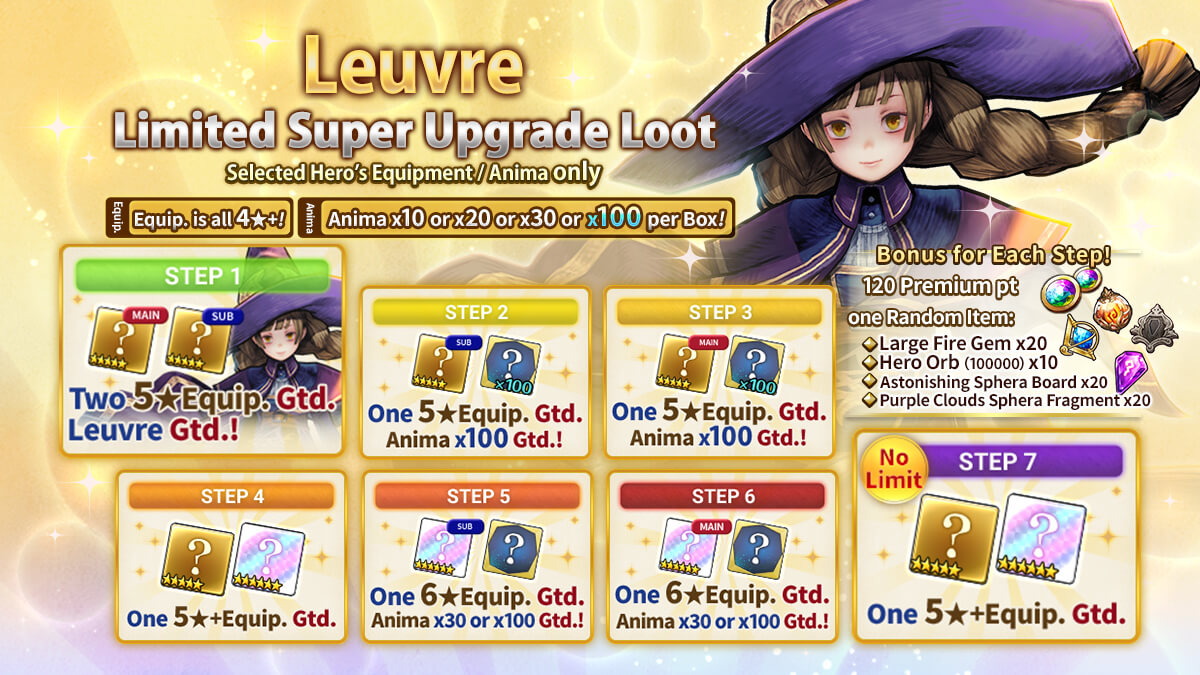
If you plan to build any Avatar hero (the one that we name it when we choose the race), we suggest to wait for this lootbox. Click the picture for the lootbox details.
5. If you're done with daily, weekly, event mission & event quests
You can do hero story to obtain more heroes if there are their potraits in their story's chapters. You can check hero story in the quest menu on the left of your screen.Or explore all area to get complete-the-map reward.
Or buy caravan's armor, main gun & sub gun from all equipment stores in towns, then fuse them to ★3 (sniper main guns, 5 poison sub guns, 1 freeze sub gun, 1 octo sub gun) and equip them.
6. Search for communicative guild
You're new to this game and the game doesn't have explanation about what you must do and such.So your best bet is to join a communicative guild that can help you, especially english speaking guild if you're on PS4 Asia server or PC/mobile.
If someone is helping you in a battle
Don't ever bring a Tanker or short range units in your deck because it will only messing up the battle.
Also the helper have a strong team, stronger than yours.
So, just bring Jhala Rolomeu Alfred Palyan Philomena & Gessy Avatar.
What facility you should upgrade
1. Top priority (in order)
Crystal PumpsCrystal Storages
Gold Storages
Anima Converter
Material Storages
Equipment Storages
Skill Lab
Equipment Lab
Gold Pumps
World Map
Equip Fusion Lab
Exterior Fusion Lab
When you can't upgrade Crystal Pumps anymore because you need to upgrade the Crystal limit, go for the next one that i listed.
When you can't upgrade Crystal Pumps anymore because you need to upgrade the Crystal limit, go for the next one that i listed.
2. Not a priority
Sphera StorageSphera Pump
Smithing Lab
Beast Cages
Fusion Lab
Accessory Lab
Wisdom Vessel
Training Capsules
How to strengthen our Tanker & Damage Dealer (in order)
1. Evolve
The biggest stats are from evolution because it increases the basic stats.Also the higher you evolve them, the more passive skills they will have.
Anima Converter is essential to get more anima that we want by sacrificing the anima of useless heroes or hard to use heroes such as logion ludmila marbas riot zaktl abefero harlequin oberon clevis eduardo gao piet gargogo ghizarru roddie trophim balroa hayami volf etc.
The requirement amount of every hero is the same, the differences are the element of the gems, the type of the sphera board, and the colour of the sphera fragment.
We've told you "You won’t be able to evolve your heroes to ★6 if you don’t do daily & weekly".
Because we need sphera board & fragment, we can only get them "free" from Tradeshop facility, that is why daily and weekly are important to do.

2. Equip ★6 equipments
We can only get equipments from fusion via Equip Fusion Lab facility, or buy a lootbox or pack with Phantasm Gems, or some login bonus, or some event.
If there is no ★6 equipment ticket on sale, you can aim for ★5 equipments from fusing four ★4 equipments for now.
Other roles (besides Tanker & Damage Dealers such as Buffer, Healer, Technical & Trickster) don't need ★6 equipment, just ★5 equipments will be enough for other roles.
By evolving the trio starter heroes (human avatar, lena, fholk, orc avatar, bogguz, melah, etc) to ★5, we can claim their ★5 equipments on Adventurer Book by pressing triangle to go to caravan menu (not facility menu or char. menu) then press square.
3. Rune
Tanker with ★6 equipments can be runed 44% Damage Reduction (DR) at max for both main and sub (total 88%).
Tanker with ★5 equipments can be runed 29% Damage Reduction at max for both main and sub (total 58%).
Use rune simulator (click here) before you add rune to your hero to prevent wrong path and have to remove runes for going to the right path.
Because if your Equipment Lab is not at maximum upgrade level, you will lose some the runes when you remove them.
Damage Dealer with ★6 equipments can be runed 27% Damage Increase (DI) and 17% Damage Reduction at max for both main and sub (total 54% and 34%).
Damage Dealer with ★5 equipments can be runed only 27% Damage Increase at max for both main and sub (total 54%).
Other roles (besides Tanker & Damage Dealers such as Buffer, Healer, Technical & Trickster) go for 27% Damage Reduction at max for both main and sub (total 54%).
Awaken Rune i, ii, and iii can be bought in Tradeshop at Duel tab, other runes are at Colosseum tab.
4. Skill
Priority in order :
Active Skill (AS)
Normal Skill (NS)
Elemental when you have evolved the hero to ★4
Attack (Damage Dealers) / Defense (non Damage Dealers)
Wisdom when you have evolved the hero to ★6
HP up when you have evolved the hero to ★5
We don't really need to increase the Resistance skill so you can just ignore it.
Skill book (battle manual) can be bought in Tradeshop at Trial tab and Legendary Trial tab.
We can also buy it on Shop (event tab) or Dark Peddler (random) & open the Trial's bag / pack.
5. Limit Break (LB)
LB is increasing the maximum level of a character.Don't LB if your character is not evolved to ★6 yet, because evolving gives higher stats and more benefits as we've written above at evolve section.
If you see 30/39, it means the current level is 30 and the maximum level is 39.
We need to level up their current level first to get the stats.
And in this game, each level only increase 2 of these stats : HP / PATK / MATK / PDEF / MDEF.
Current level 26 / 31 / 36 only increase PATK & MDEF
Current level 27 / 32 / 37 only increase HP & MATK
Current level 28 / 33 / 38 only increase PATK & PDEF
Current level 29 / 34 / 39 only increase MATK & MDEF
Current level 30 / 35 / 40 only increase HP & PDEF
LB uses anima (50 55 60 65 70 75 80 90 100 120, total 765).
So, the sweet spot of MATK characters are at current level 32, 34, 37, 39.
While PATK characters are at current level 31, 33, 36, 38.
Total anima for a ★1 hero to evolve them to ★6 (10+20+50+100+200 = 380) and LB them to max.level 40 is 1145 anima.
6. Support equipments
Just fill this with four ★4 equipments both main and sub (total 8).
But fill this later after you have a lot of ★4 equipments or ★4 hammers.
7. Perfume / Accessory
Can only be obtained if you joined an active guild that can beat Enigma event.And click here for more info about Enigma.
8. Wisdom Vessel
Last priority because it's very expensive.We need 20 anima for each circle, total 15 circles (300 anima) for now.
How to get more anima
Fixed result
• Anima Converter facility
• Tradeshop, Recall / Recollection tab
• Up to 20 heroes in caravan menu
• Clear hero story
• Cross story
• Adventurer Book (caravan menu / press triangle ➝ press square)
• Anima pack (at least 2k pgems for 20+20 anima of 2 heroes)
• Super Supporting Lootbox (13k pgems for 230 anima)
Random
• Peddlers (Auntie, Dark, Event)
• Polka sale in caravan menu (random 3 heroes & once a month, 1500 pgems for 30 anima)
• Lootbox with guaranteed amount (1k pgems for 20 anima or 3k for 200 anima)What lootbox should you buy other than ★6 equipment ticket
The one with guaranteed hero.Check their skills first before buying (triangle for caravan menu → setting → others → library)
Or ★5 ~ ★6 equipments with reasonable price such as :
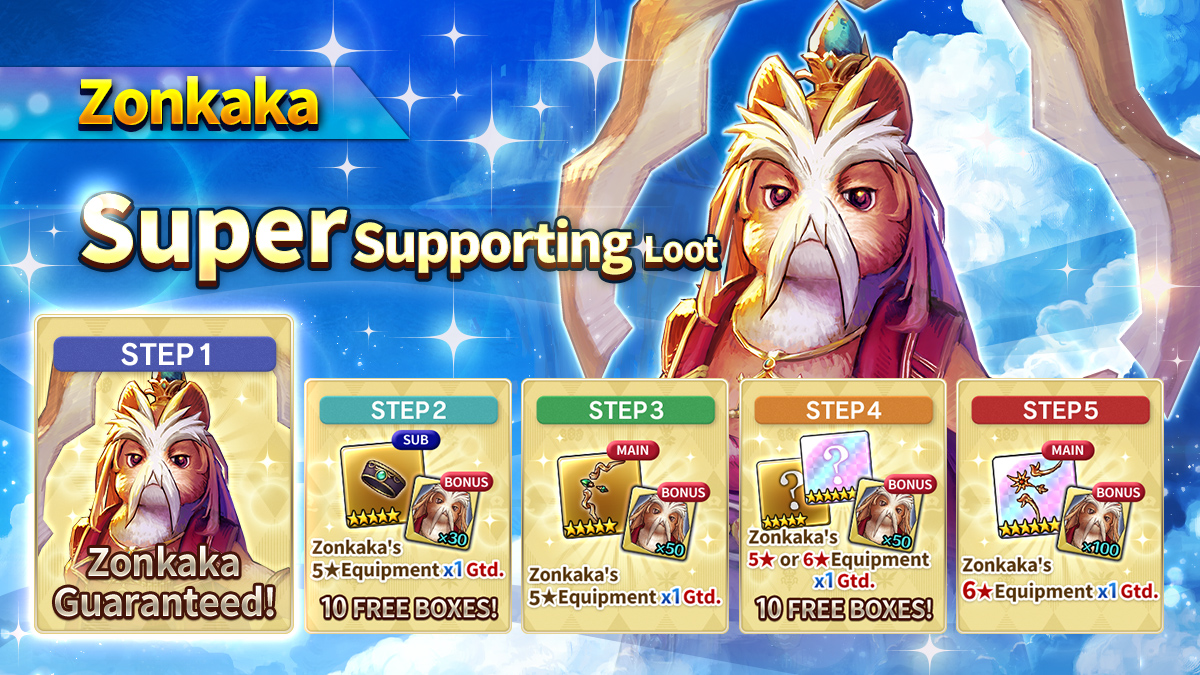
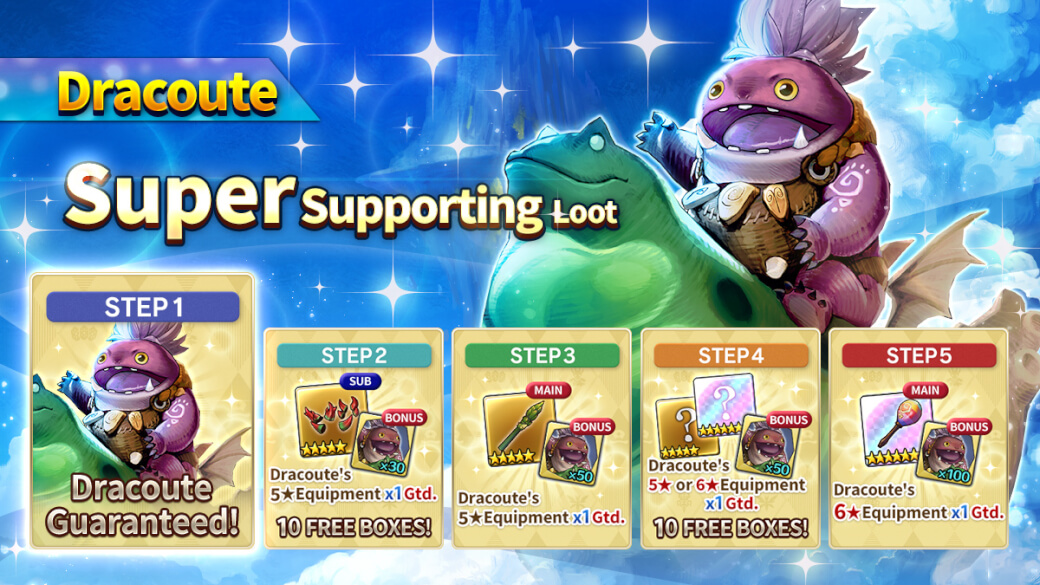
1. 「Super Supporting Loot」 of not-recruitable hero with rarity ★5 for 13k Phantasm Gems
This box contains the hero on the banner with their ★5 equipments, ★6 main equipment, and 230 of their anima.
It means this Zonkaka / Dracoute box makes you can have a ★665 hero instantly.
★665 means ★6 evolution stage, ★6 main equipment, ★5 sub equipment.
Click the picture for the lootbox details.
2. 「5★ Heroes' Anima x200 Guaranteed Loot」 for 3k Phantasm Gems
This box contains only 200 anima of a random ★5 hero.
Legendary heroes (Azzaria etc), collaboration heroes (Glass etc) & event heroes (Angie etc) are not included.
Click the picture for the lootbox details.
3. 「Five Heroes Guaranteed Loot」 for 3k Phantasm Gems
This box contains 5 random heroes from rarity ★1 to ★5.
Not all ★5 heroes are in the lootbox, so check the lineup before buying on the official website or in game.
Click the picture for the lootbox details.

Legendary heroes (Ranvold etc), collaboration heroes (Melty etc) & event heroes (Olga etc) are not included.
4. 「For Beginners」 for 10500 Phantasm Gems
This box is only good if you dont have the hero and their 6★ equipments (or 5★ equipments if the hero is support such as Philomena, Axion, Isaiah, Martha, Rolomeu).
Notable heroes
- Gacha only
Karin (Tanker)
Gavin Break (Tanker)
Lasharna (Crowd Control)
Garstan (Crowd Control)
Isaiah (Healer but more like Buffer)
Vongyra (Buffer, a must have from lootbox or unlock with his 100 anima)- Recruitable
Garad (a must have Buffer & Debuffer, from lootbox or unlock with his 200 anima)
Garad (a must have Buffer & Debuffer, from lootbox or unlock with his 200 anima)
Martha (Buffer & Debuffer, a must have, recruitable from her story)
Armidal (Quick Buffer)
Alotie (Debuffer)
Dilla (Debuffer)
Padanoa (Crowd Control)
Palyan (Healer but more like Buffer)
Alfred (Buffer)
Damage Dealers :
- Gacha only
Psychopomp Sophia
Aquamirror Lili
EbisLucky
Regent Emily
Siobhan
Zonkaka
Littaria
- Recruitable
Waugogo
Leuvre
Rufus
Leriora (Crowd Control)Gil (Crowd Control)
Almimi (Crowd Control)
Emily
Molly
Jillian
Lili
You can also open https://gamewith.jp/caravanstories/article/show/292684#PVEranking for reference (hero's icons are clickable) on your browser with built in translator
How to get Phantasm Gems (pgems)
• Buy with your money
• Daily to-do
• Colosseum & Duel highest class rewards
One time only (not repeatable)
• Do all main stories / reincarnate 5 times
• Deeds
• Read iyarr history on polka bookshelf
• Adventurer book
• Event login bonus• Clear these sub quests (300 pgems each, thanks to Johnny.#8656, Kazu#4962 on Discord, and myself lol) :
HUMAN
Garmenia Region
・South Mauriana F8, Rolando, defeat Deer 65k BP [hard]
・Earl Lipton's Mansion Gate / Atrim Plateau C9, Alf, defeat Shadow Knight 45k BP [hard]
Southern Garmenia Region
・Oresto Valley G7, Randee, defeat Wolf 20k BP
・Carvendel Foothills E8, Sean, defeat Bulkie 3k BP
Macmarmia Region, Lake Lomond E9, Haydn, defeat Gargoyle 44k BP [hard]
ORK
Dogaa Region
・Western Zuera D8, Zel, defeat Salamandrine 45k BP [hard]
・Namjha River H6, Jaddeh, defeat Pleco > Porcupine > Aligator > Hercules Beetle 92k BP (hard)
Western Dogaa Region
・Khyber Peak F11, Babi, defeat Wolf 25k BP
・Ringaa Ruins F10, Gulg, defeat Owlbear 45k BP [hard]
・Western Dogaa I9, Do Ras, defeat Bulkie 3k BP
ELF
Releias Region, Aleia Castle A6, Eldova, clear Rufus' 2nd story
Lipharufa Region
・Mt.Schoffel H6, Marianne, defeat Wolf 2766 BP
・Mt.Schoffel H7, Aimer, defeat Grizzly 7403 BP
・Luwiera's Ridge G9, Dominic, defeat Bulkie 1612 BP
DWARF
・Baldora Region, Lanask Plain B10, Valantina, defeat Wolf 13k BP
・Slavley Region, Southern Rostov E8, Yhana, defeat Baribusa 60k BP [hard]
・Milworth Region, Northern Uragan E7, Adriana, defeat Kelenken 65K BP [hard]
After clearing all sub quests on certain areas, there will be an extra quest with exlamation mark to fight a strong beast :
・Clear all sub quests in Rovanier & defeat King Goosefish at Rocca Wetland H7 (18:00~02:59 in game time / xx:47~xx:09 real time)
・Clear all sub quests in Trumbull Dominion at Pembroke Region & defeat Elder Utan at Eastern Zuera 2 B8
Setting
Game Setting
• Camera following speed MAX (for faster)
• Use new direction type skills ON (to be able to move the red zone of active skill)
• Active skill cursor speed MAX
Map Setting
• Accelerate autoplay ACCELERATE
• Autoplay stops after exiting from battle OFF
• Anchor minimap to north ON
• Field map default display ALL
How to unlock more areas
HUMAN
• Garmenia region (Atrim Plateau) : go to portal at Wheat Field C11 / top right, or do Riot's story
• S.Garmenia region (Denon Hill, Iru Shrine, Eastern Denon, Cape Lantz) : go to portal at south of Fholka Village
• Macmarmia region (Reuben, Geel Amphitheatre, Lake Lomond) : talk to raward at Port of Nero F7 / center of the map, or just click auto on talk to tarantio in reuben main quest
Gizalbo region
• Doreas Fault : go to portal at Woogrich Village F9 / bottom right, or do Milcosta's 1st story
• Twilight Grassland : go to portal at Doreas Fault G10 / bottom right
Farehn region
• Scott Plateau : go to portal at Twilight Grassland G11 / east
• Scott Battlefield Remains : go to portal at Scott Plateau H9 / bottom right
• Guriam Borderland : go to portal at Scott Plateau D10 / top right
• Glenn Forest & Waterling Main Road : go to Scott Battlefield Remains i6 & clear Reaumur's 1st story, click here for the video and read the description
• Avon region (West Nevis Peak, Wale Pass, Crescent Hot Spring Town) : clear Roddie’s 4th story, Fholk's 3rd story, Calamity's 4th story, defeat follower of darcissus sub quest (take the quest at West Nevis Peak), click the name for videos and read the descriptions
• Pembroke region (Rudale Canyon & Trumbull Dominion) : go to portal at bottom left of Rasberg Mine
ORK
Zuoi region
• Huge Drum of Baarzhoi : clear Kwaralu's 1st story, click here for the video and read the description
• Rugarza Village : clear Riardo's 1st story, Slaveia's 3rd story, Galga's 3rd story, then go to portal at bottom left of Huge Drum of Baarzhoi, click the name for videos and read the descriptions
East Dogaa region
• Urdon Fungal Jungle & Southern Urdon : clear Ghuldoh's 2nd story, Gada's 1st story, then meet buriee near entrance of Fort Dogaa, click the name for videos and read the descriptions
• Grief Swamp & White Execution Pit : clear Alligator Gar sub quest (multiplayer able, ask on world chat or guild for help)
Dogaa region
• Eastern Zuera : clear zargan sub quest at Northern Zuera E11 (solo battle, click here for the video and read the description)
ELF
• Foraria region (Valley of Foria): go to the portal at Ricerca Field G12 / bottom right
North Lipharufa / N.Lipharufa region
• Rocca Wetland : defeat Eagle King (solo battle, click here for the video and read the description)
• Tunturi Valley & Northern Tunturi : clear expedition report quest & defeat Thieves (solo battle, click here for the video and read the description)
Lipharufa region
• Luwiera's Ridge South : clear to luwiera's ridge south sub quest & defeat Fairie Bulkie, click here for the video and read the description
DWARF
S.Lowemir region (Woogrich Village) : complete human reincarnation & talk to grievous at Southern Lanask E10
Severna region
• Ghelbours Foothills, Mt Ghelbours, Bashkar Glacier : talk to dwarf NPC at 3 o'clock / east of Mad Cow Brewery, meet Kiehl Dane near the entrance of Milworth, do the quest that requires you to defeat Snowstorm Leopard & ioti (multiplayer able, ask on world chat or guild for help)
• Gherisk Arctic Town : clear Rocko's 2nd story(?) click here for the video and read the description
• Lowemir region (Sogaeras) : clear Gil's 5th story, click here for the video and read the description
Gessy
• Campana (Canyari Mine) : clear main quest that requires you to defeat a Huge Coconut Crab (multiplayer able, ask on world chat or guild for help)
Marupopo region
• Southern Chaktek : clear Mignono's and Malma's 1st story
• Chaktek Great Rift Valley : clear main quest that requires you to defeat a Moonlight Tiger (multiplayer able, ask on world chat or guild for help)
• Mudrooroo (Corozal Seaport) : clear Lili's 4th story & do quest to go to Nunnari Rice Terraces (defeat Shishibami Sparrow), click the name for videos and read the descriptions
Lizardman
Mil Gatoro
• Bunwaii Desert, East Bunwai, Fort Nonvua : clear Lamelaiza's story, click here for the video and read the description